经过上一篇文章「第1讲 BERT 原理与预训练教程:Masked LM 与 Next Sentence Prediction 图解」 第1.3.1节内容的介绍,相信大家对于BERT模型的整体结构已经有了一定的了解。根据图1-8可知,本质上来说BERT就是由多个不同的Transformer结构堆叠而来,同时在Embedding部分多加入了一个Segment Embedding。在接下来的代码实现过程中,将会以图1-5中黑色加粗字体所示的部分为一个类来分别进行实现。不过在正式介绍BERT模型的代码实现前,先来介绍一下整个代码的工程结构,以及学习一下BERT模型中的参数管理。
2.1 工程结构#
由于整个项目涉及到的代码模块较多,所以有必要在这里先进行说明,这样也便于大家在阅读后续文章时能够快速地定位到相应的代码部分。同时,也强烈建议大家在阅读的同时能够结合着代码一起阅读,并动手实践。
工程代码仓库:https://github.com/moon-hotel/BertWithPretrained 获取!
如若发现代码可能存在问题,请上github拉取最新版本代码或提交issue!
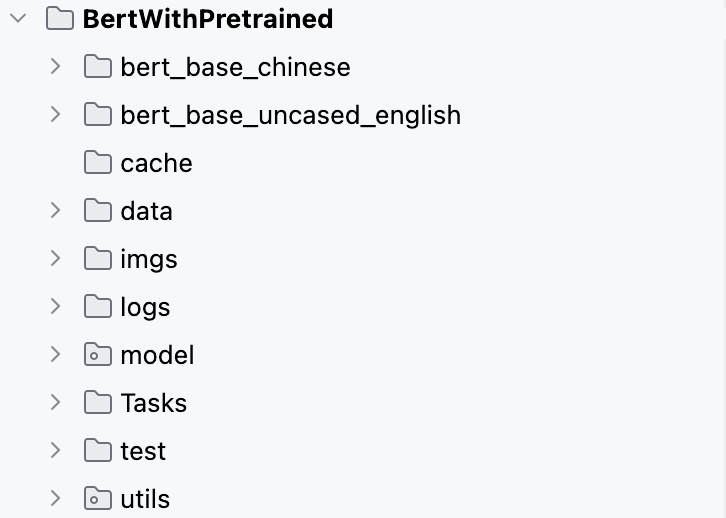
如图2-1所示是整个工程的目录结构,包含了两个预训练模型、缓存目录、数据集目录、模型目录、下游任务目录、测试案例目录和工具模块目录。
1) 预训练模型目录
在图2-1中,最上面的两个文件夹分别是一个常用的中文以及英文的开源预训练模型。每个文件夹里面都包含有3个文件,分别是模型参数、模型超参数配置和对应的词表文件,以bert_base_chinese为例,如图2-2所示。
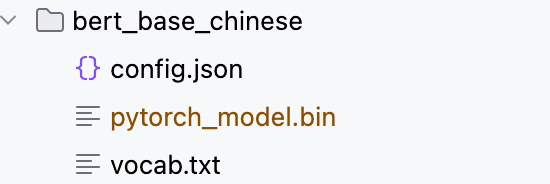
在图2-2中,config.json是BERT模型的默认配置内容;pytorch_model.bin是huggingface[8]开源的BERT中文预训练模型;vocab.txt是词表。一般来说大多数情况下我们都不需要去修改这些配置,唯一可能改动的就是config.json中的部分参数。
2) 缓存目录
在图2-1中,cache目录是用来存放训练过程中所保存下来的模型。
3) 数据集目录
在图2-1中,data目录是用来存放各个下游任务的相关数据集,目前来说一共有6个数据集,如图2-3所示。
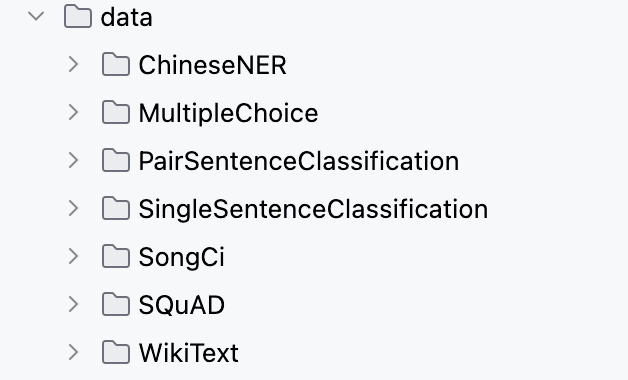
如图2-3所示,MultpleChoice、PairSentenceClassification、SingleSentenceClassification和SQuAD这4个目录分别对应的是4个下游任务的数据集;SongCi和WikiText是后面用于NSP和MLM两个任务的数据集,后面实际使用时会仔细进行介绍。
4) 模型目录
在图2-1中,model目录中存放的是整个BERT模型的实现代码,以及下游任务的相关实现,如图2-4所示。
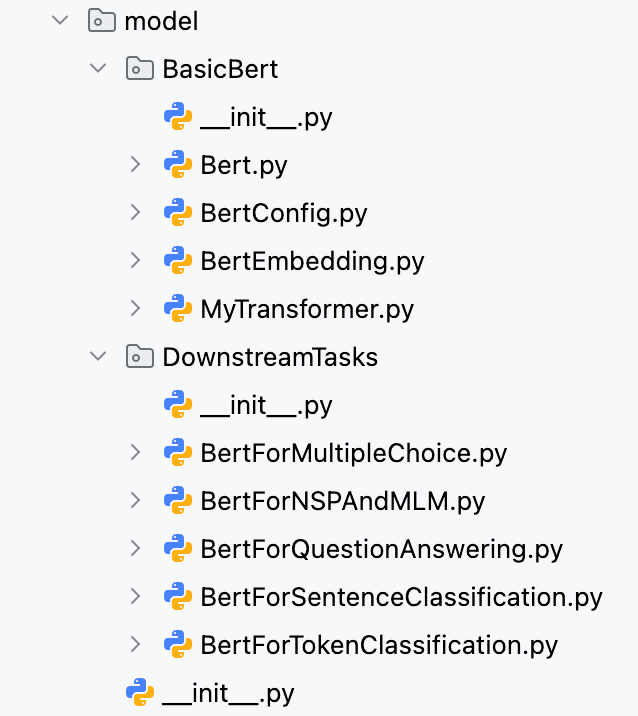
如图2-4所示,BasicBert目录中是BERT模型各个部分的实现,其中 MyTransformer.py 是整个Transformer结构的实现,这里我们需要引用到其中的 MultiheadAttention 模块;BertEmbedding.py 是BERT模型中InputEmbedding模块的实现;BertConfig.py 是BERT模型的配置导入实现;Bert.py 是整个BERT模型的实现。
在图2-4中,DownstreamTasks目录中是BERT模型各个下游任务的实现,包括针对单文本和多文本分类的 BertForSentenceClassification.py 模块;针对多问题选择的 BertForMultipleChoice.py 模块;针对SQuAD问题回答的 BretForQuestionAnswering.py 模块;以及针对NSP和MLM预训练过程的 BertForNSPAndMLM.py 模块。
5) 下游任务目录
在图2-1中,Tasks目录中存放的是model中各个任务的模型训练代码,如图2-5所示。
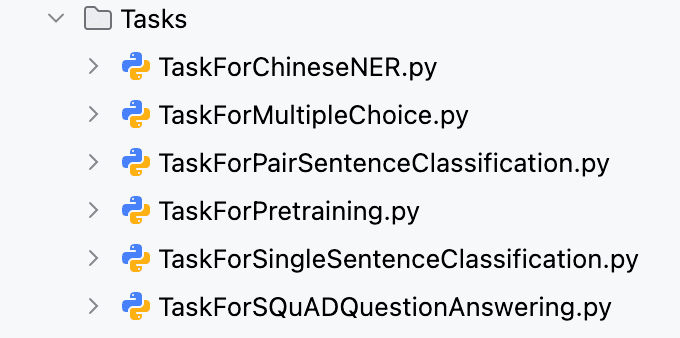
在图2-5中, Tasks目录是BERT模型各个任务训练部分的实现,包括针对单文本分类的 TaskForSingleSentenceClassification.py 模块;针对多文本分类的 TaskForPairSentenceClassification.py 模块;针对多问题选择的 TaskForMultipleChoice.py 模块;针对SQuAD问题回答的 TaskForSQuADQuestionAnswering.py 模块;以及针对NSP和MLM预训练过程的 TaskForPretraining.py 训练模块。
6) 测试案例目录
在图2-1中,test目录中存放的是各个模块测试案例,用于在现实过程中的验证,后续内容中的相关使用示例都能在其中找到。
7) 工具模块目录
在图2-1中,utils目录中存放的是一些辅助工具模块,如图2-6所示。
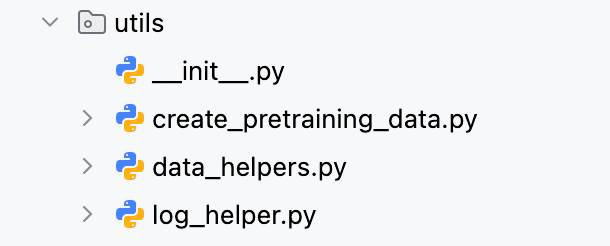
如图2-6所示,log_helper.py 是日志输出内容的相关定义;data_helpers.py 是所有下游任务的数据集构造实现;create_pretraining_data.py 是NSP和MLM任务的数据集构造实现。
2.2 参数管理#
在模型的实现过程中,我们通常都会定义一个Config类并用类的成员变量来保存模型的各个参数值。当然,如果你需要从本地文件中读取参数(例如bert的config.json文件),那么只需要将读取后的结果赋值到Config类的各个成员变量即可。通过类对象来管理参数最大的一个好处就是容易扩展新的参数。因为使用类对象来管理参数时传递给模型的都是一个实例化对象,这样在新增加参数时就不需要在相关接口处再定义新的形参。此时只需要在Config类中增加一个成员变量,然后在模型的相关地方以访问类成员的方式来使用参数。
2.2.1 初始化类成员#
如下是定义的一个BertConfig类,里面的成员变量就是模型中的各个超参数:
 1 class BertConfig(object):
 2     def __init__(self, vocab_size=21128,
 3                  hidden_size=768,
 4                  num_hidden_layers=12,
 5                  num_attention_heads=12,
 6                  intermediate_size=3072,
 7                  pad_token_id=0,
 8                  hidden_act="gelu",
 9                  hidden_dropout_prob=0.1,
10                  attention_probs_dropout_prob=0.1,
11                  max_position_embeddings=512,
12                  type_vocab_size=2,
13                  initializer_range=0.02):
14
15         self.vocab_size = vocab_size
16         self.hidden_size = hidden_size
17         self.num_hidden_layers = num_hidden_layers
18         self.num_attention_heads = num_attention_heads
19         self.hidden_act = hidden_act
20         self.intermediate_size = intermediate_size
21         self.pad_token_id = pad_token_id
22         self.hidden_dropout_prob = hidden_dropout_prob
23         self.attention_probs_dropout_prob = attention_probs_dropout_prob
24         self.type_vocab_size = type_vocab_size
25         self.max_position_embeddings = max_position_embeddings
27         self.initializer_range = initializer_range
在上述代码中,第16~27行便是BERT模型默认的所有超参数变量,同时在类的初始化方法中也给了相应的默认值。
2.2.2 导入本地参数#
进一步,我们还需要实现一个方法来从本地文件中导入config.json这个默认配置文件,并重新赋值给BertConfig类的各个成员变量中,实现代码如下:
 1     @classmethod
 2     def from_dict(cls, json_object):
 3         """Constructs a BertConfig from a Python dictionary of parameters.""
 4         config = BertConfig(vocab_size=None)
 5         for (key, value) in six.iteritems(json_object):
 6             config.__dict__[key] = value
 7         return config
 8
 9     @classmethod
10     def from_json_file(cls, json_file):
11         """Constructs a BertConfigfrom a json file of parameters."""
12         """从json配置文件读取配置信息"""
13         with open(json_file, 'r') as reader:
14             text = reader.read()
15         logging.info(f"成功导入BERT配置文件 {json_file}")
16         return cls.from_dict(json.loads(text))
在上述代码中,第10~15行是载入本地配置文件得到一个json对象;第16行是通过from_dict方法来将json对象的每个参数值赋值到BertConfig类对象中。这里值得一提的是,在Python中@classmethod修饰器的作用是在不实例化类对象之前也能够使用对应的类方法,即方法中的第1个形参cls便是为实例化的类对象。
2.2.3 使用示例#
在实现完上述代码后,便可以通过如下方式来进行使用:
1 if __name__ == '__main__':
2     json_file = '../bert_base_chinese/config.json'
3     config = BertConfig.from_json_file(json_file)
4     print(config.hidden_size)
5     print(config.vocab_size)
6
7 # 768
8 # 21128
在上述代码中,第2行是配置文件所在的路径;第3行是根据config.json中的参数来实例化BertConfig类对象并返回该对象;第4~5行是以访问类成员的方式来使用模型的相关参数。
2.3 Input Embedding 实现#
首先,我们先来看Input Embedding的实现过程。为了复用之前在介绍Transformer实现时所用到的这部分代码,我们直接在这基础上再加一个Segment Embedding即可。
2.3.1 Token Embedding#
Token Embedding,也叫做词嵌入,算是NLP中将文本表示为稠密向量的一个基本操作,其原理就不再赘述,具体实现如下:
 1 class TokenEmbedding(nn.Module):
 2     def __init__(self, vocab_size, hidden_size, pad_token_id=0, initializer_range=0.02):
 3         super(TokenEmbedding, self).__init__()
 4         self.embedding = nn.Embedding(vocab_size, hidden_size, padding_idx=pad_token_id)
 5         self._reset_parameters(initializer_range)
 6
 7     def forward(self, input_ids):
 8         """
 9         :param input_ids: shape : [input_ids_len, batch_size]
10         :return: shape: [input_ids_len, batch_size, hidden_size]
11         """
12         return self.embedding(input_ids)
13
14     def _reset_parameters(self, initializer_range):
15         for p in self.parameters():
16             if p.dim() > 1:
17                 normal_(p, mean=0.0, std=initializer_range)
在上述代码中,第4行中的padding_idx是用来指定序列中用于padding处理的索引编号,一般来说默认都是0。在指定padding_idx后,如果输入序列中有0,那么对应位置的向量就会全是0。当然,这一步不做也可以,因为在计算自主力权重的时候会通过padding_mask向量来去掉这部分内容,具体可参见文章[6]第3节中的内容。第5行是用给定的方式来初始化参数,当然这几乎不会用到。因为不管是在下游任务中微调,还是继续通过NSL和MLM这两个任务来训练模型参数,我们大多数情况下都会再开源的BERT模型参数上进行,而不是从头再来。第7~12行是Token Embedding的前向传播过程;第14~17行是上面提到的参数初始化方法。
2.3.2 Positional Embedding#
对于Positional Embedding来说,其作用便是用来解决自注意力机制不能捕捉到文本序列内部各个位置之间顺序的问题。关于这部分内容原理的介绍,可以参见文章[6]第2节中的内容。不同于Transformer中Positional Embedding的实现方式,在BERT中Positional Embedding并没有采用固定的变换公式来计算每个位置上的值,而是采用了类似普通Embedding的方式来为每个位置生成一个向量,然后随着模型一起训练。因此,这一操作就限制了在使用预训练的中文BERT模型时,最大的序列长度只能是512,因为在训练时只初始化了512个位置向量。具体地,其实现代码如下:
 1 class PositionalEmbedding(nn.Module):
 2     """
 3     # Since the position embedding table is a learned variable, we create it
 4     # using a (long) sequence length max_position_embeddings. The actual
 5     # sequence length might be shorter than this, for faster training of
 6     # tasks that do not have long sequences.
 7
 8     https://github.com/google-research/bert/blob/master/modeling.py
 9     """
10
11     def __init__(self, hidden_size, max_position_embeddings=512, initializer_range=0.02):
12         super(PositionalEmbedding, self).__init__()
13         # 因为BERT预训练模型的长度为512
14         self.embedding = nn.Embedding(max_position_embeddings, hidden_size)
15         self._reset_parameters(initializer_range)
16
17     def forward(self, position_ids):
18         """
19         :param position_ids: [1,position_ids_len]
20         :return: [position_ids_len, 1, hidden_size]
21         """
22         return self.embedding(position_ids).transpose(0, 1)
从上述代码可以看出,Positional Embedding本质上也就是一个普通的Embedding层,只是在这一场景下作者赋予了它特俗的含义,即序列中的每一个位置有自己独属的向量表示。同时, 在默认配置中,第14行中的max_position_embeddings值为512,也就是只支持最大512个token的输入。
2.3.3 Segment Embedding#
Segment Embedding的原理及目的在文章[6]中已经详细介绍过,总结起来就是为了满足下游任务中存在需要两句话同时输入到模型中的场景,即可以看成是对输入的两个序列分别赋予一个位置向量用以区分各自所在的位置。这一点可以和上面的Positional Embedding进行类比。具体地,其实现代码如下:
 1 class SegmentEmbedding(nn.Module):
 2     def __init__(self, type_vocab_size, hidden_size, initializer_range=0.02):
 3         super(SegmentEmbedding, self).__init__()
 4         self.embedding = nn.Embedding(type_vocab_size, hidden_size)
 5         self._reset_parameters(initializer_range)
 6
 7     def forward(self, token_type_ids):
 8         """
 9         :param token_type_ids:  shape: [token_type_ids_len, batch_size]
10         :return: shape: [token_type_ids_len, batch_size, hidden_size]
11         """
12         return self.embedding(token_type_ids)
在上述代码中,type_vocab_size的默认值为2,即只用于区分两个序列的不同位置。
2.3.4 Bert Embeddings#
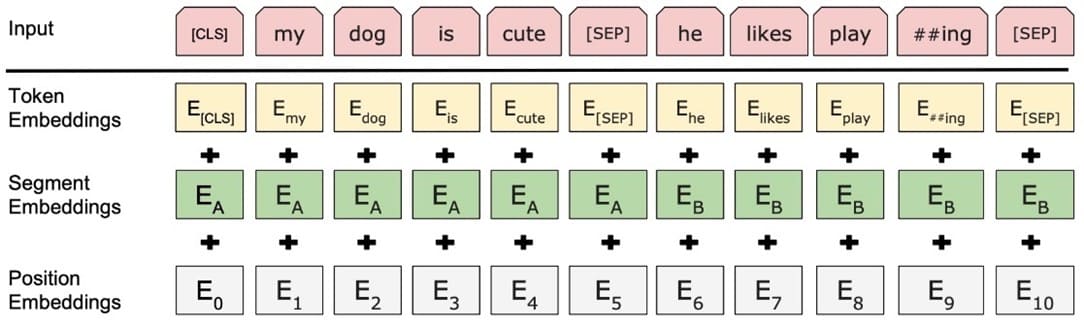
在完成Token、Positional、Segment Embedding这3个部分的代码之后,只需要将每个部分的结果相加即可得到最终的Input Embedding作为模型的输入,如图2-7所示。
具体地,其代码实现为:
 1 class BertEmbeddings(nn.Module):
 2     def __init__(self, config):
 3         super().__init__()
 4         self.word_embeddings = TokenEmbedding(config.vocab_size,
 5                                               config.hidden_size,
 6                                               config.pad_token_id,
 7                                               config.initializer_range)
 8         # return shape [src_len,batch_size,hidden_size]
 9         self.position_embeddings = PositionalEmbedding(config.max_position_embeddings,
10                                              config.hidden_size,
11                                              config.initializer_range)
12         # return shape [src_len,1,hidden_size]
13         self.token_type_embeddings=SegmentEmbedding(config.type_vocab_size,
14                                                     config.hidden_size,
15                                                    config.initializer_range)
16         # return shape  [src_len,batch_size,hidden_size]
17         self.LayerNorm = nn.LayerNorm(config.hidden_size)
18         self.dropout = nn.Dropout(config.hidden_dropout_prob)
19         self.register_buffer("position_ids", torch.arange(config.max_position_embeddings).expand((1, -1)))
20         # shape: [1, max_position_embeddings]
在上述代码中,config是传入的一个配置类,里面各个类成员就是BERT中对应的模型参数。第4、9、13行便是用来分别定义图2-1中的3部分Embedding。第19行代码是用来生成一个默认的位置id,即[0,1,….,512],在后续可以通过self.position_ids来进行调用。
进一步,其前向传播过程代码为:
 1     def forward(self,
 2                 input_ids=None,
 3                 position_ids=None,
 4                 token_type_ids=None):
 5
 6         src_len = input_ids.size(0)
 7         token_embedding = self.word_embeddings(input_ids)
 8         # shape:[src_len,batch_size,hidden_size]
 9
10         if position_ids is None:
11             position_ids = self.position_ids[:, :src_len]  # [1,src_len]
12         positional_embedding = self.position_embeddings(position_ids)
13         # [src_len, 1, hidden_size]
14
15         if token_type_ids is None:
16             token_type_ids = torch.zeros_like(input_ids,
17                    device=self.position_ids.device)  # [src_len, batch_size]
18         segment_embedding = self.token_type_embeddings(token_type_ids)
19         # [src_len,batch_size,hidden_size]
20
21         embeddings = token_embedding+positional_embedding+segment_embedding
22         embeddings = self.LayerNorm(embeddings)
23         embeddings = self.dropout(embeddings)
24         return embeddings # [src_len,batch_size,hidden_size]
在上述代码中,第7行input_ids表示输入序列的原始token id,即根据词表映射后的索引,其形状为[src_len, batch_size];第10行position_ids是位置序列,本质就是 [0,1,2,3,…,src_len-1],其形状为[1,src_len],在实际建模时这个参数其实可以不用传值,因为当其为空时会自动从self.position_ids截取一段;第15行token_type_ids用于不同序列之间的分割,例如[0,0,0,0,1,1,1,1]用于区分前后不同的两个句子,形状为[src_len,batch_size],如果输入模型的只有一个序列,那么这个参数也不用传值。第21~23行代码则是用来将3部分Embeeding的结果相加。
2.3.5 使用示例#
在完成上述Embedding部分的代码实现后,便可以通过如下方式来进行使用:
 1 from model.BasicBert.BertEmbedding import BertEmbeddings
 2 from model.BasicBert.BertConfig import BertConfig
 3 import torch
 4
 5 if __name__ == '__main__':
 6     json_file = '../bert_base_chinese/config.json'
 7     config = BertConfig.from_json_file(json_file)
 8     src = torch.tensor([[1,3,5, 7, 9], [2, 4, 6, 8, 10]], dtype=torch.long)
 9     src = src.transpose(0, 1)  # [src_len, batch_size]
10     token_type_ids = torch.LongTensor([[0, 0, 0, 1, 1], [0, 0, 1, 1, 1]]).transpose(0, 1)
11     bert_embedding = BertEmbeddings(config)
12     bert_embedding_result=bert_embedding(src,token_type_ids=token_type_ids)
13     print(" --------- 测试BertEmbedding ------------")
14     print("bert embedding shape [src_len, batch_size, hidden_size]: ", bert_embedding_result.shape)
上述代码运行结束后将会输出如下结果:
1  --------- 测试BertEmbedding ------------
2 bert embedding shape [src_len,batch_size,hidden_size]: torch.Size([5,2,768])
2.4 BertModel 实现#
在实现完Input Embedding部分的代码后,下面就可以着手来实现构成BERT模型的第2个重要组成部分BertEncoder了。如图2-8所示,整个BertEncoder由多个BertLayer堆叠形成;而BertLayer又是由BertOutput、BertIntermediate和BertAttention这3个部分组成;同时BertAttention是由BertSelfAttention和BertSelfOutput所构成。
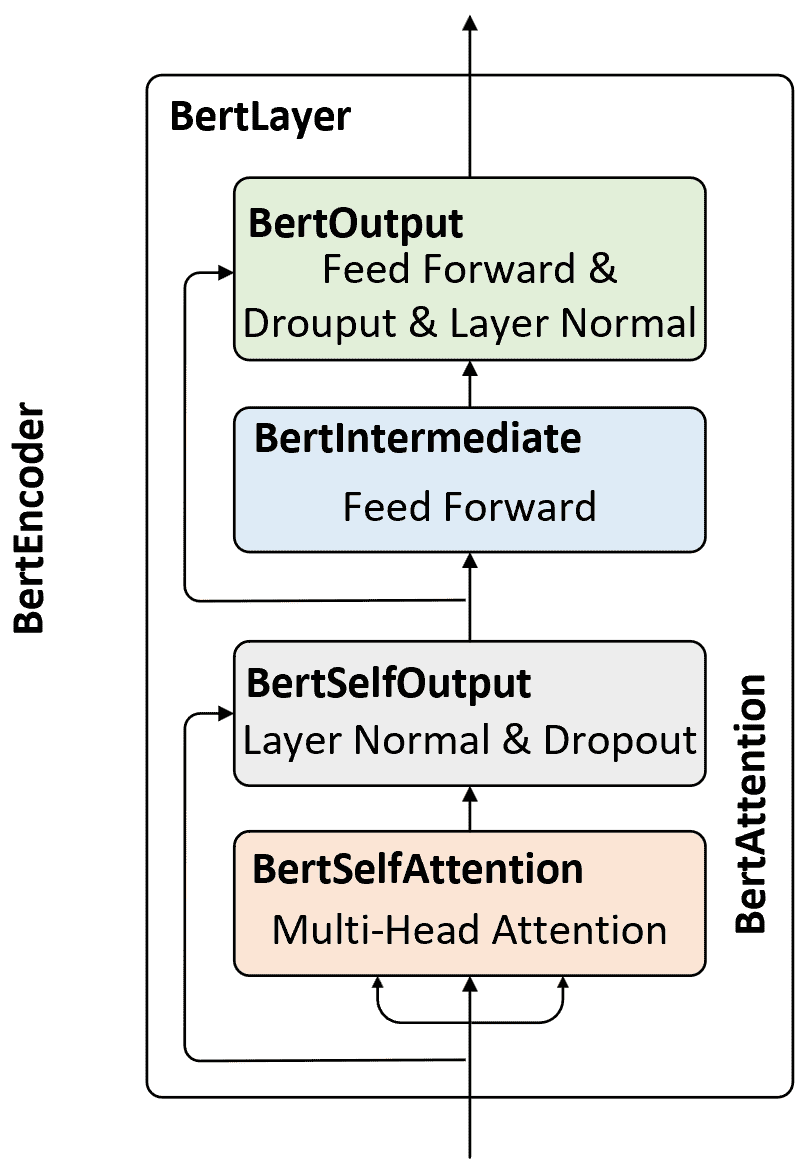
接下来,我们就以图2-8中从下到上的顺序来依次对每个部分进行实现。
2.4.1 BertAttention 实现#
对于BertAttention来说,需要明白的是其核心就是在Transformer中所提出来的self-attention机制,也就是图2-8中的BertSelfAttention模块;其次再是一个残差连接和标准化操作。对于BertSelfAttention的实现,其代码如下:
 1 class BertSelfAttention(nn.Module):
 2     def __init__(self, config):
 3         super(BertSelfAttention, self).__init__()
 4         if 'use_torch_multi_head' in config.__dict__ and config.use_torch_multi_head:
 5             MultiHeadAttention = nn.MultiheadAttention
 6         else:
 7             MultiHeadAttention = MyMultiheadAttention
 8         self.multi_head_attention = MultiHeadAttention(config.hidden_size,
 9                                                config.num_attention_heads,
10                                       config.attention_probs_dropout_prob)
11
12     def forward(self,query,key,value, attn_mask=None,key_padding_mask=None):
13         return self.multi_head_attention(query, key, value,
14                                         attn_mask=attn_mask,
15                                         key_padding_mask=key_padding_mask)
在上述代码中,第4~10行是实例化一个多头注意力机制对象,并且这里提供了两种多头实现:一种是之前Transformer中我们自己的实现,另一种则是PyTorch中的实现;可以通过设置参数use_torch_multi_head = True来使用PyTorch中的实现。第12~15行则是多头注意力的前向传播过程,其返回包含两个部分:多头注意力的线性组合以及多头注意力权重的均值。
如上便是BertSelfAttention的实现代码,其对应的就是GoogleResearch[7]代码中的attention_layer方法。正如前面所说,BertSelfAttention本质上就是Transformer模型中的self-attention模块,具体原理可参见文章[6],这里就不再赘述。
对于BertSelfOutput的实现,其主要就是层Dropout、标准化和残差连接3个操作,代码如下:
 1 class BertSelfOutput(nn.Module):
 2     def __init__(self, config):
 3         super().__init__()
 4         self.LayerNorm = nn.LayerNorm(config.hidden_size, eps=1e-12)
 5         self.dropout = nn.Dropout(config.hidden_dropout_prob)
 6
 7     def forward(self, hidden_states, input_tensor):
 8         """
 9         :param hidden_states: [src_len, batch_size, hidden_size]
10         :param input_tensor: [src_len, batch_size, hidden_size]
11         :return: [src_len, batch_size, hidden_size]
12         """
13         hidden_states = self.dropout(hidden_states)
14         hidden_states = self.LayerNorm(hidden_states + input_tensor)
15         return hidden_states
上述代码便是BertSelfOutput的实现,其过程也十分简单,这里就不再赘述。
接下来就是对BertAttention部分的实现,其由BertSelfAttention和BertSelfOutput这两个类构成,代码如下:
 1 class BertAttention(nn.Module):
 2     def __init__(self, config):
 3         super().__init__()
 4         self.self = BertSelfAttention(config)
 5         self.output = BertSelfOutput(config)
 6
 7     def forward(self,
 8                 hidden_states,
 9                 attention_mask=None):
10         """
11         :param hidden_states: [src_len, batch_size, hidden_size]
12         :param attention_mask: [batch_size, src_len]
13         :return: [src_len, batch_size, hidden_size]
14         """
15         self_outputs = self.self(hidden_states,
16                                  hidden_states,
17                                  hidden_states,
18                                  attn_mask=None,
19                                  key_padding_mask=attention_mask)
20         # self_outputs[0] shape: [src_len, batch_size, hidden_size]
21         attention_output = self.output(self_outputs[0], hidden_states)
22         return attention_output
在上述代码中,第8行hidden_states是Input Embedding处理后的结果;第9行的attention_mask就是同一个batch中不同长度序列的padding信息,具体可以参见文章[6]第3节的内容;第15行是自注意力机制的输出结果;第21行便是执行BertSelfOutput中的3个操作。
2.4.2 BertLayer 实现#
根据图2-8可知,BertLayer里面还有BertOutput和BertIntermediate这两个模块,因此下面先来实现这两个部分。
对于BertIntermediate来说也就是一个普通的全连接层,因此实现起来也非常简单,代码如下:
 1 class BertIntermediate(nn.Module):
 2     def __init__(self, config):
 3         super().__init__()
 4         self.dense = nn.Linear(config.hidden_size, config.intermediate_size)
 5         if isinstance(config.hidden_act, str):
 6             self.intermediate_act_fn = get_activation(config.hidden_act)
 7         else:
 8             self.intermediate_act_fn = config.hidden_act
 9
10     def forward(self, hidden_states):
11         """
12         :param hidden_states: [src_len, batch_size, hidden_size]
13         :return: [src_len, batch_size, intermediate_size]
14         """
15         hidden_states = self.dense(hidden_states)
16	# [src_len, batch_size, intermediate_size]
17         if self.intermediate_act_fn is None:
18             hidden_states = hidden_states
19         else:
20             hidden_states = self.intermediate_act_fn(hidden_states)
21         return hidden_states
在上述代码中,第6行用来根据指定参数获取激活函数,其代码实现如下所示:
 1 def get_activation(activation_string):
 2     act = activation_string.lower()
 3     if act == "linear":
 4         return None
 5     elif act == "relu":
 6         return nn.ReLU()
 7     elif act == "gelu":
 8         return nn.GELU()
 9     elif act == "tanh":
10         return nn.Tanh()
11     else:
12         raise ValueError("Unsupported activation: %s" % act)
进一步,对于BertOutput来说,其包含有其包含有一个全连接层和残差连接,实现代码如下:
 1 class BertOutput(nn.Module):
 2     def __init__(self, config):
 3         super().__init__()
 4         self.dense = nn.Linear(config.intermediate_size, config.hidden_size)
 5         self.LayerNorm = nn.LayerNorm(config.hidden_size, eps=1e-12)
 6         self.dropout = nn.Dropout(config.hidden_dropout_prob)
 7
 8     def forward(self, hidden_states, input_tensor):
 9         """
10         :param hidden_states: [src_len, batch_size, intermediate_size]
11         :param input_tensor: [src_len, batch_size, hidden_size]
12         :return: [src_len, batch_size, hidden_size]
13         """
14         hidden_states = self.dense(hidden_states)
15	# [src_len, batch_size, hidden_size]
16         hidden_states = self.dropout(hidden_states)
17         hidden_states = self.LayerNorm(hidden_states + input_tensor)
18         return hidden_states
在上述代码中,第8行里hidden_states指的就是BertIntermediate模块的输出,而input_tensor则是BertAttention部分的输出。
在实现完这两个部分的代码后,便可以通过BertAttention、BertIntermediate和BertOutput这3个部分来实现组合的BertLayer部分,代码如下:
 1 class BertLayer(nn.Module):
 2     def __init__(self, config):
 3         super().__init__()
 4         self.bert_attention = BertAttention(config)
 5         self.bert_intermediate = BertIntermediate(config)
 6         self.bert_output = BertOutput(config)
 7
 8     def forward(self,
 9                 hidden_states,
10                 attention_mask=None):
11         """
12         :param hidden_states: [src_len, batch_size, hidden_size]
13         :param attention_mask: [batch_size, src_len] mask掉padding部分的内容
14         :return: [src_len, batch_size, hidden_size]
15         """
16         attention_output=self.bert_attention(hidden_states, attention_mask)
17         # [src_len, batch_size, hidden_size]
18         intermediate_output = self.bert_intermediate(attention_output)
19         # [src_len, batch_size, intermediate_size]
20         layer_output=self.bert_output(intermediate_output, attention_output)
21         # [src_len, batch_size, hidden_size]
22         return layer_output
从上述代码中可以发现,对于BertLayer的实现来说其整体逻辑也并不太复杂,就是根据BertAttention、BertOutput和BertIntermediate这三部分构造而来;同时每个部分输出后的维度也都进行了标注以便大家进行理解。
到此,对于BertLayer部分的实现就介绍完了,下面继续来看如何对BertEncoder进行实现。
2.4.3 BertEncoder 实现#
根据图2-8所示可知,BERT主要由Input Embedding和BertEncoder这两部分构成;而BertEncoder是有多个BertLayer堆叠所形成,因此需要先实现BertEncoder,代码如下:
 1 class BertEncoder(nn.Module):
 2     def __init__(self, config):
 3         super().__init__()
 4         self.config = config
 5         self.bert_layers = nn.ModuleList([BertLayer(config) for _ in
 6                                  range(config.num_hidden_layers)])
 7
 8     def forward(
 9             self,
10             hidden_states,
11             attention_mask=None):
12         """
13         :param hidden_states: [src_len, batch_size, hidden_size]
14         :param attention_mask: [batch_size, src_len]
15         :return:
16         """
17         all_encoder_layers = []
18         layer_output = hidden_states
19         for i, layer_module in enumerate(self.bert_layers):
20             layer_output = layer_module(layer_output, attention_mask)
21             #  [src_len, batch_size, hidden_size]
22             all_encoder_layers.append(layer_output)
23         return all_encoder_layers
在上述代码中,第5~6行便是用来定义多个BertLayer;第18~22行用来循环计算多层BertLayer堆叠后的输出结果。最后,只需要按需将BertEncoder部分的输出结果输入到下游任务即可。
进一步,在将BertEncoder部分的输出结果输入到下游任务前,需要将其进行略微的处理,代码如下:
 1 class BertPooler(nn.Module):
 2     def __init__(self, config):
 3         super().__init__()
 4         self.dense = nn.Linear(config.hidden_size, config.hidden_size)
 5         self.activation = nn.Tanh()
 6         self.config = config
 7
 8     def forward(self, hidden_states):
 9         """
10         :param hidden_states:  [src_len, batch_size, hidden_size]
11         :return: [batch_size, hidden_size]
12         """
13         if self.config.pooler_type == "first_token_transform":
14             token_tensor = hidden_states[0, :].reshape(-1, self.config.hidden_size)
15         elif self.config.pooler_type == "all_token_average":
16             token_tensor = torch.mean(hidden_states, dim=0)
17         pooled_output = self.dense(token_tensor) #[batch_size, hidden_size]
18         pooled_output = self.activation(pooled_output)
19         return pooled_output  # [batch_size, hidden_size]
在上述代码中,第13~14行代码用来取BertEncoder输出的第一个位置([cls]位置),例如在进行文本分类时可以取该位置上的结果进行下一步的分类处理;第15~16行是自己加入的一个选项,表示取所有位置的平均值,当然我们也可以根据自己的需要在添加下面添加其它的方式;最后,17-19行就是一个普通的全连接层。
2.4.4 BertModel 实现#
到此,对于BERT模型中的各个基础模块就已经实现完毕了。如图2-9所示,只需要再将各个部分的代码组合到一起便完成了对于BERT模型的实现。
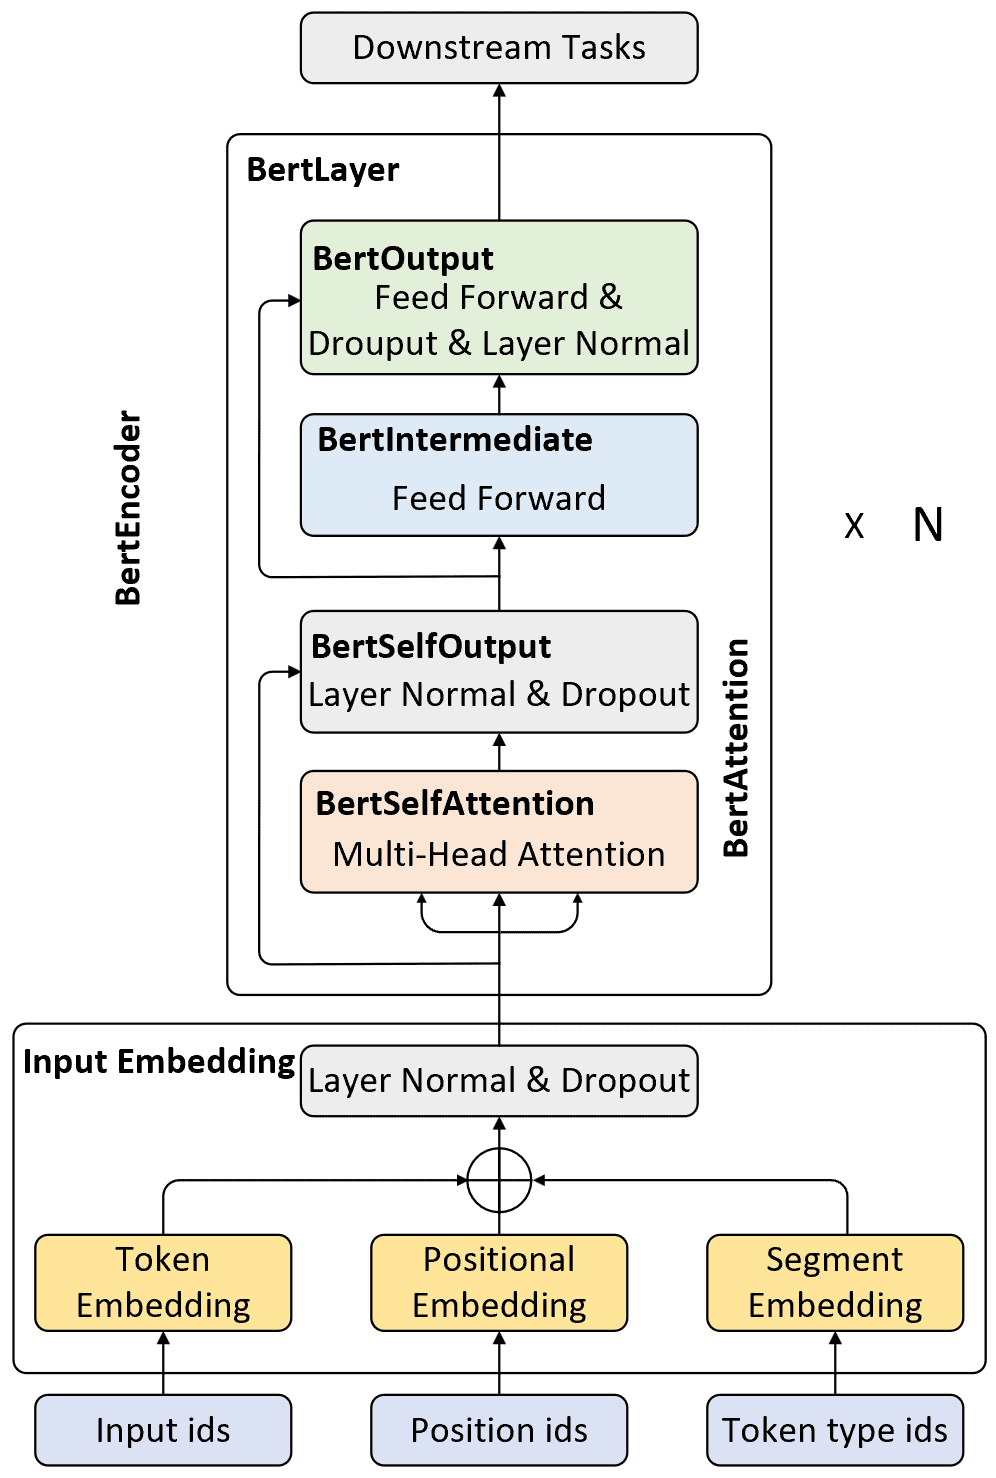
基于上述所有实现便可以搭建完成整个BERT的主体结构,代码如下:
 1 class BertModel(nn.Module):
 2     def __init__(self, config):
 3         super().__init__()
 4         self.bert_embeddings = BertEmbeddings(config)
 5         self.bert_encoder = BertEncoder(config)
 6         self.bert_pooler = BertPooler(config)
 7         self.config = config
 8         self._reset_parameters()
 9
10     def forward(self,
11                 input_ids=None,
12                 attention_mask=None,
13                 token_type_ids=None,
14                 position_ids=None):
15         """
16         :param input_ids:  [src_len, batch_size]
17         :param attention_mask: [batch_size, src_len] mask掉padding部分的内容
18         :param token_type_ids: [src_len, batch_size] 如果输入模型的只有一个序列,那么这个参数也不用传值
19         :param position_ids: [1,src_len] 在实际建模时这个参数其实可以不用传值
20         :return:
21         """
22         embedding_output = self.bert_embeddings(input_ids=input_ids,
23                                                 position_ids=position_ids,
24                                               token_type_ids=token_type_ids)
25         all_encoder_outputs = self.bert_encoder(embedding_output,
26                                               attention_mask=attention_mask)
27         sequence_output = all_encoder_outputs[-1]
28         pooled_output = self.bert_pooler(sequence_output)
29         return pooled_output, all_encoder_outputs
如上代码所示便是整个BERT部分的实现,可以发现在厘清了整个思路后这部分代码理解起来就相对容易了。第22~24行便是Input Embedding后的输出结果,其形状为[src_len, batch_size, hidden_size];第25~26行是整个BERT编码部分的输出,其中all_encoder_outputs 为一个包含有num_hidden_layers个层的输出;第27行是处理得到整个BERT网络的输出,这里取了最后一层的输出,形状为[src_len, batch_size, hidden_size];第28行默认是最后一层的第1个token 即[cls]位置经dense + tanh 后的结果,其形状为[batch_size, hidden_size]。
到此,对于整个BERT主体部分的代码实现就介绍完了。需要提醒大家的是,在阅读本文的过程中最好是结合着每个部分的输出结果(包括形状和意义)来进行理解,以便能更加清晰的认识BERT模型。
2.4.5 使用示例#
在完成上述整个BERT模型的代码实现后,便可以通过如下方式来进行使用:
 1     json_file = '../bert_base_chinese/config.json'
 2     config = BertConfig.from_json_file(json_file)
 3     config.__dict__['use_torch_multi_head'] = True
 4     src = torch.tensor([[1, 3, 5, 7, 9, 2, 3], [2, 4, 6, 8, 10, 0, 0]], dtype=torch.long)
 5     src = src.transpose(0, 1)  # [src_len, batch_size]
 6     print(f"input shape [src_len,batch_size]: ", src.shape)
 7     token_type_ids = torch.LongTensor([[0, 0, 0, 1, 1, 1, 1], [0, 0, 1, 1, 1, 0, 0]]).transpose(0, 1)
 8     attention_mask = torch.tensor([[True,True,True,True,True,True,True],
 9                                    [True,True,True,True,True,False,False]])
10     position_ids = torch.arange(src.size()[0]).expand((1, -1)) # [1,src_len]
11     bert_model = BertModel(config)
12     bert_model_output = bert_model(input_ids=src,
13                                    attention_mask=attention_mask,
14                                    token_type_ids=token_type_ids,
15                                    position_ids=position_ids)[0]
16     print(f"BertModel's pooler output shape [batch_size, hidden_size]: ",
上述代码运行结束后便会得到类似如下所示的结果:
 1 - INFO: 成功导入BERT配置文件 ../bert_base_chinese/config.json
 2 input shape [src_len,batch_size]:  torch.Size([7, 2])
 3 BertModel’s pooler output shape [batch_size,hidden_size]: [2, 768])
 4   =======  BertMolde 参数: ========
 5 bert_embeddings.position_ids   torch.Size([1, 518])
 6 bert_embeddings.word_embeddings.embedding.weight torch.Size([21128, 768])
 7 bert_embeddings.position_embeddings.embedding.weight torch.Size([518, 768])
 8 bert_embeddings.token_type_embeddings.embedding.weight torch.Size([2, 768])
 9 bert_embeddings.LayerNorm.weight     torch.Size([768])
10 bert_embeddings.LayerNorm.bias   torch.Size([768])
11 ……
12 bert_encoder.bert_layers.0.bert_intermediate.dense.weight
13 torch.Size([3072, 768])
14 bert_encoder.bert_layers.0.bert_intermediate.dense.bias  torch.Size([3072])
15 bert_encoder.bert_layers.0.bert_output.dense.weight  torch.Size([768, 3072])
16 bert_encoder.bert_layers.0.bert_output.dense.bias    torch.Size([768])
17 bert_encoder.bert_layers.0.bert_output.LayerNorm.weight   torch.Size([768])
18 bert_encoder.bert_layers.0.bert_output.LayerNorm.bias    torch.Size([768])
19 ……
20 bert_encoder.bert_layers.1.bert_intermediate.dense.bias   torch.Size([3072])
21 bert_encoder.bert_layers.1.bert_output.dense.weight  torch.Size([768, 3072])
22 bert_encoder.bert_layers.1.bert_output.dense.bias    torch.Size([768])
23 bert_encoder.bert_layers.1.bert_output.LayerNorm.weight    torch.Size([768])
24 bert_encoder.bert_layers.1.bert_output.LayerNorm.bias    torch.Size([768])
25 ……