经过前面几节内容的介绍,相信大家对于BERT预训练模型的使用已经有了一定的认识。不过为了满足不同人群的学习需求,在这篇文章中将会介绍基于BERT预训练模型的第3个下游任务场景,即如何完成推理问答选择任务。所谓问答选择指的就是同时给模型输入一个问题和若干选项的答案,最后需要模型从给定的选项中选择一个最符合问题逻辑的答案。可问题在于我们应该怎么来构建这个模型呢?
通常来说,在NLP领域的很多场景中模型最后所做的基本上都是一个分类任务,虽然表面上看起来不是。例如:文本蕴含任务其实就是将两个序列拼接在一起,然后预测其所属的类别;基于神经网络的序列生成模型(翻译、文本生成等)本质就是预测词表中下一个最有可能出现的词,此时的分类类别就是词表的大小。因此,从本质上来说本文介绍的问答选择任务以及在后面将要介绍的问题回答任务其实都是一个分类任务,而关键的地方就在于如何构建模型的输入和输出。
6.1 任务构造原理#
正如前面所说,对于问答选择这个任务场景来说其本质上依旧可以归结为分类任务,只是关键在于如何构建这个任务以及整个数据集。对于问答选择这个场景来说,其整体原理如图6-1所示。
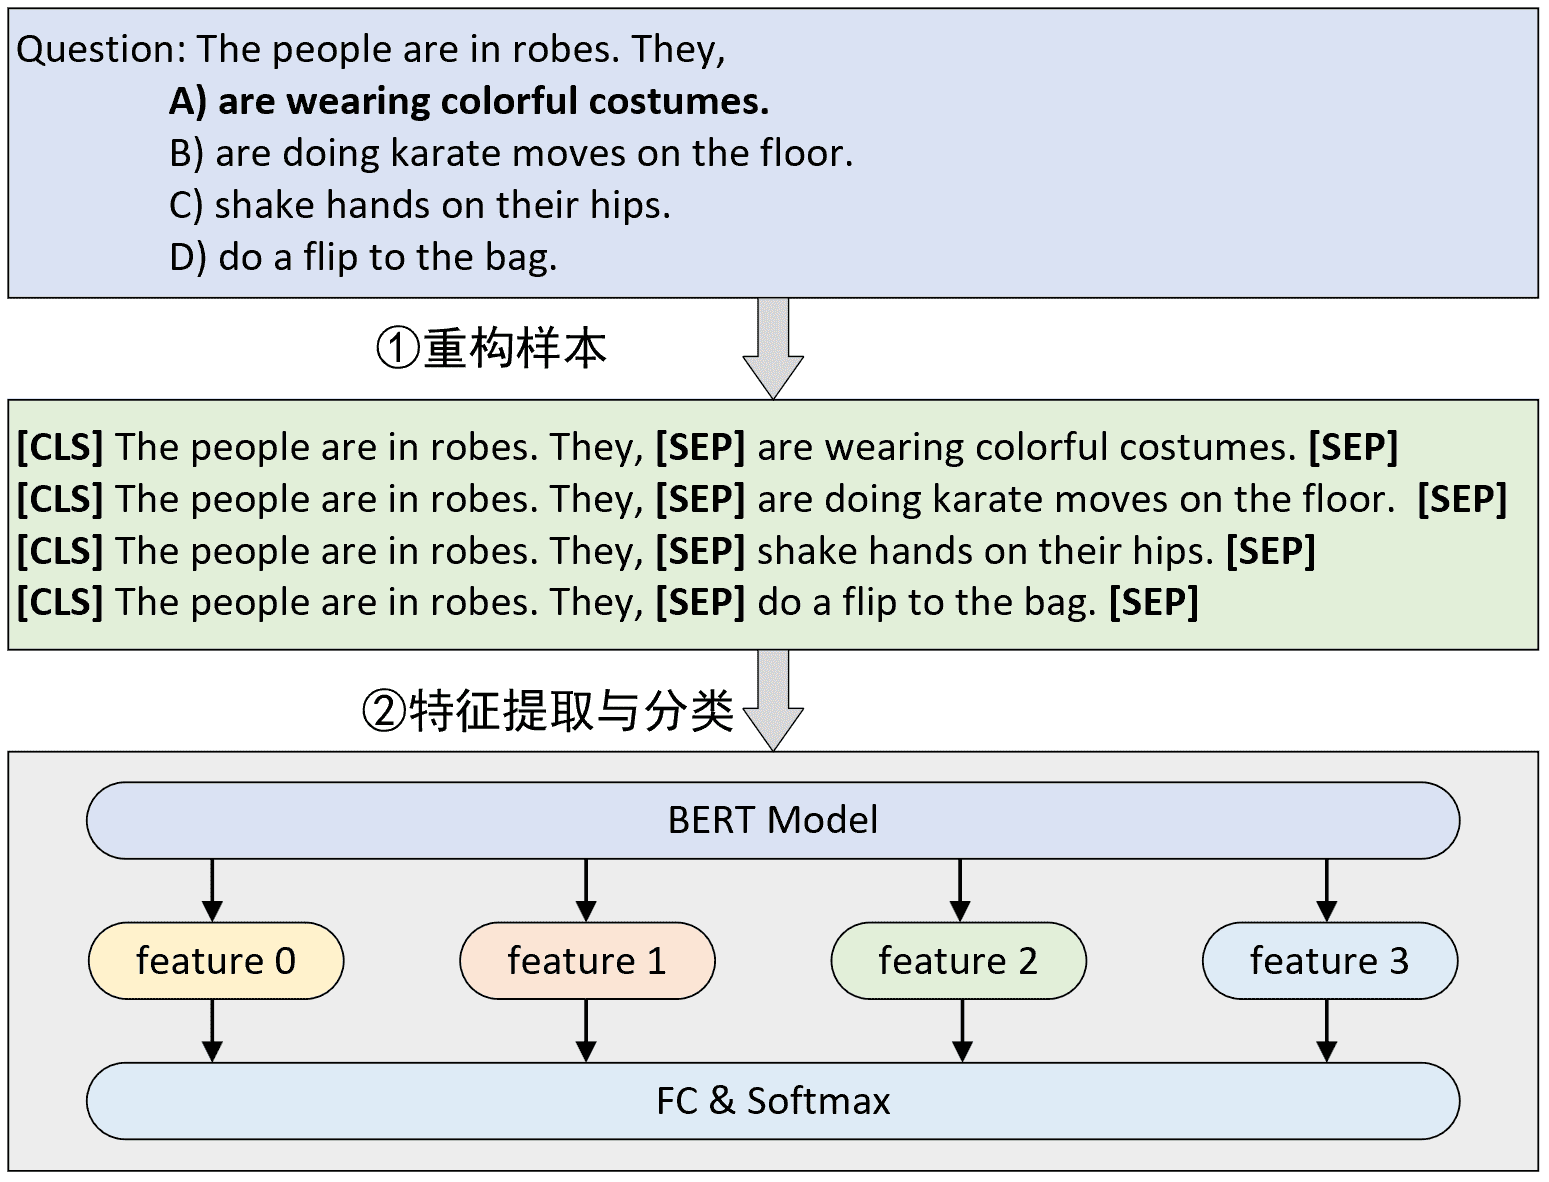
如图6-1所示,是一个基于BERT预训练模型的四选一问答选择模型的原理图。从图中可以看出,原始数据的形式是一个问题和四个选项,模型需要做的就是从四个选项中给出最合理的一个,于是也就变成了一个四分类任务。同时,构建模型输入的方式就是将原始问题和每一个答案都拼接起来构成一个序列中间用[SEP]符号隔开,然后再分别输入到BERT模型中进行特征提取得到四个特征向量形状为 [4,hidden_size] ,最后再经过一个分类层进行分类处理得到预测选项。值得一提的是,通常情况下这里的四个特征都是直接取每个序列经BERT编码后的[CLS]向量。
到此,对于问答选择整个模型的原理我们算是清楚了,下面首先来看如何构造数据集。
6.2 数据预处理#
6.2.1 输入介绍#
根据第6.1节内容的介绍,对于问答任务来说其接受的输入也分为两个部分:一是由问题和每个选项这两个句子所组成的Token序列,并且需要在两个句子的开始位置加上一个[CLS]符号,以及两个句子之间和结尾分别加上一个[SEP]符号;二是Segment Embedding部分的输入,用于确定两个句子的所属部分。最后将两者均作为模型的输入即可。
同时,这里需要注意的是,虽然对于BERT模型来说“问题+一个选项”构成的序列就是一个样本,但是我们在构造数据集的时候,还是需要将“问题+四个选项”看成一个整体,然后在输入模型之前在变形为对应的形状。
6.2.2 语料介绍#
在这里,我们使用到的也是论文中所提到的SWAG(The Situations With Adversarial Generations )数据集[16] [17],即给定一个情景(一个问题或一句描述),任务是模型从给定的四个选项中预测最有可能的一个。
如下所示便是部分原始示例数据:
1 ,video-id,fold-ind,startphrase,sent1,sent2,gold-source, ending0,ending1, ending2,ending3,label
2 0,anetv_NttjvRpSdsI,19391,The people are in robes. They,The people are in robes.,They,gold,are wearing colorful costumes.,are doing karate moves on the floor.,shake hands on their hips.,do a flip to the bag.,0
3 1,lsmdc3057_ROBIN_HOOD-27684,16344,She smirks at someone and rides off. He,She smirks at someone and rides off.,He,gold,smiles and falls heavily.,wears a bashful smile.,kneels down behind her.,gives him a playful glance.,1
在上述示例中,数据集中一共有12个字段(第1行)包含两个样本(第2~3行),我们这里需要用到的就是sent1,ending0,ending1,ending2,ending3,label这6个字段。例如对于第一个样本来说,其形式如下:
1 The people are in robes. They
2   A) wearing colorful costumes. # 正确选项
3   B) are doing karate moves on the floor.
4   C) shake hands on their hips.
5   D) do a flip to the bag.
同时,由于该数据集已经做了训练集、验证集和测试集(没有标签)的划分,所以后续我们也就不需要来手动划分了。
6.2.3 数据集预览#
同样,在正式介绍如何构建数据集之前我们先通过一张图来了解一下整个大致构建的流程。假如我们现在有两个样本构成了一个batch,那么其整个数据的处理过程则如图6-2所示。
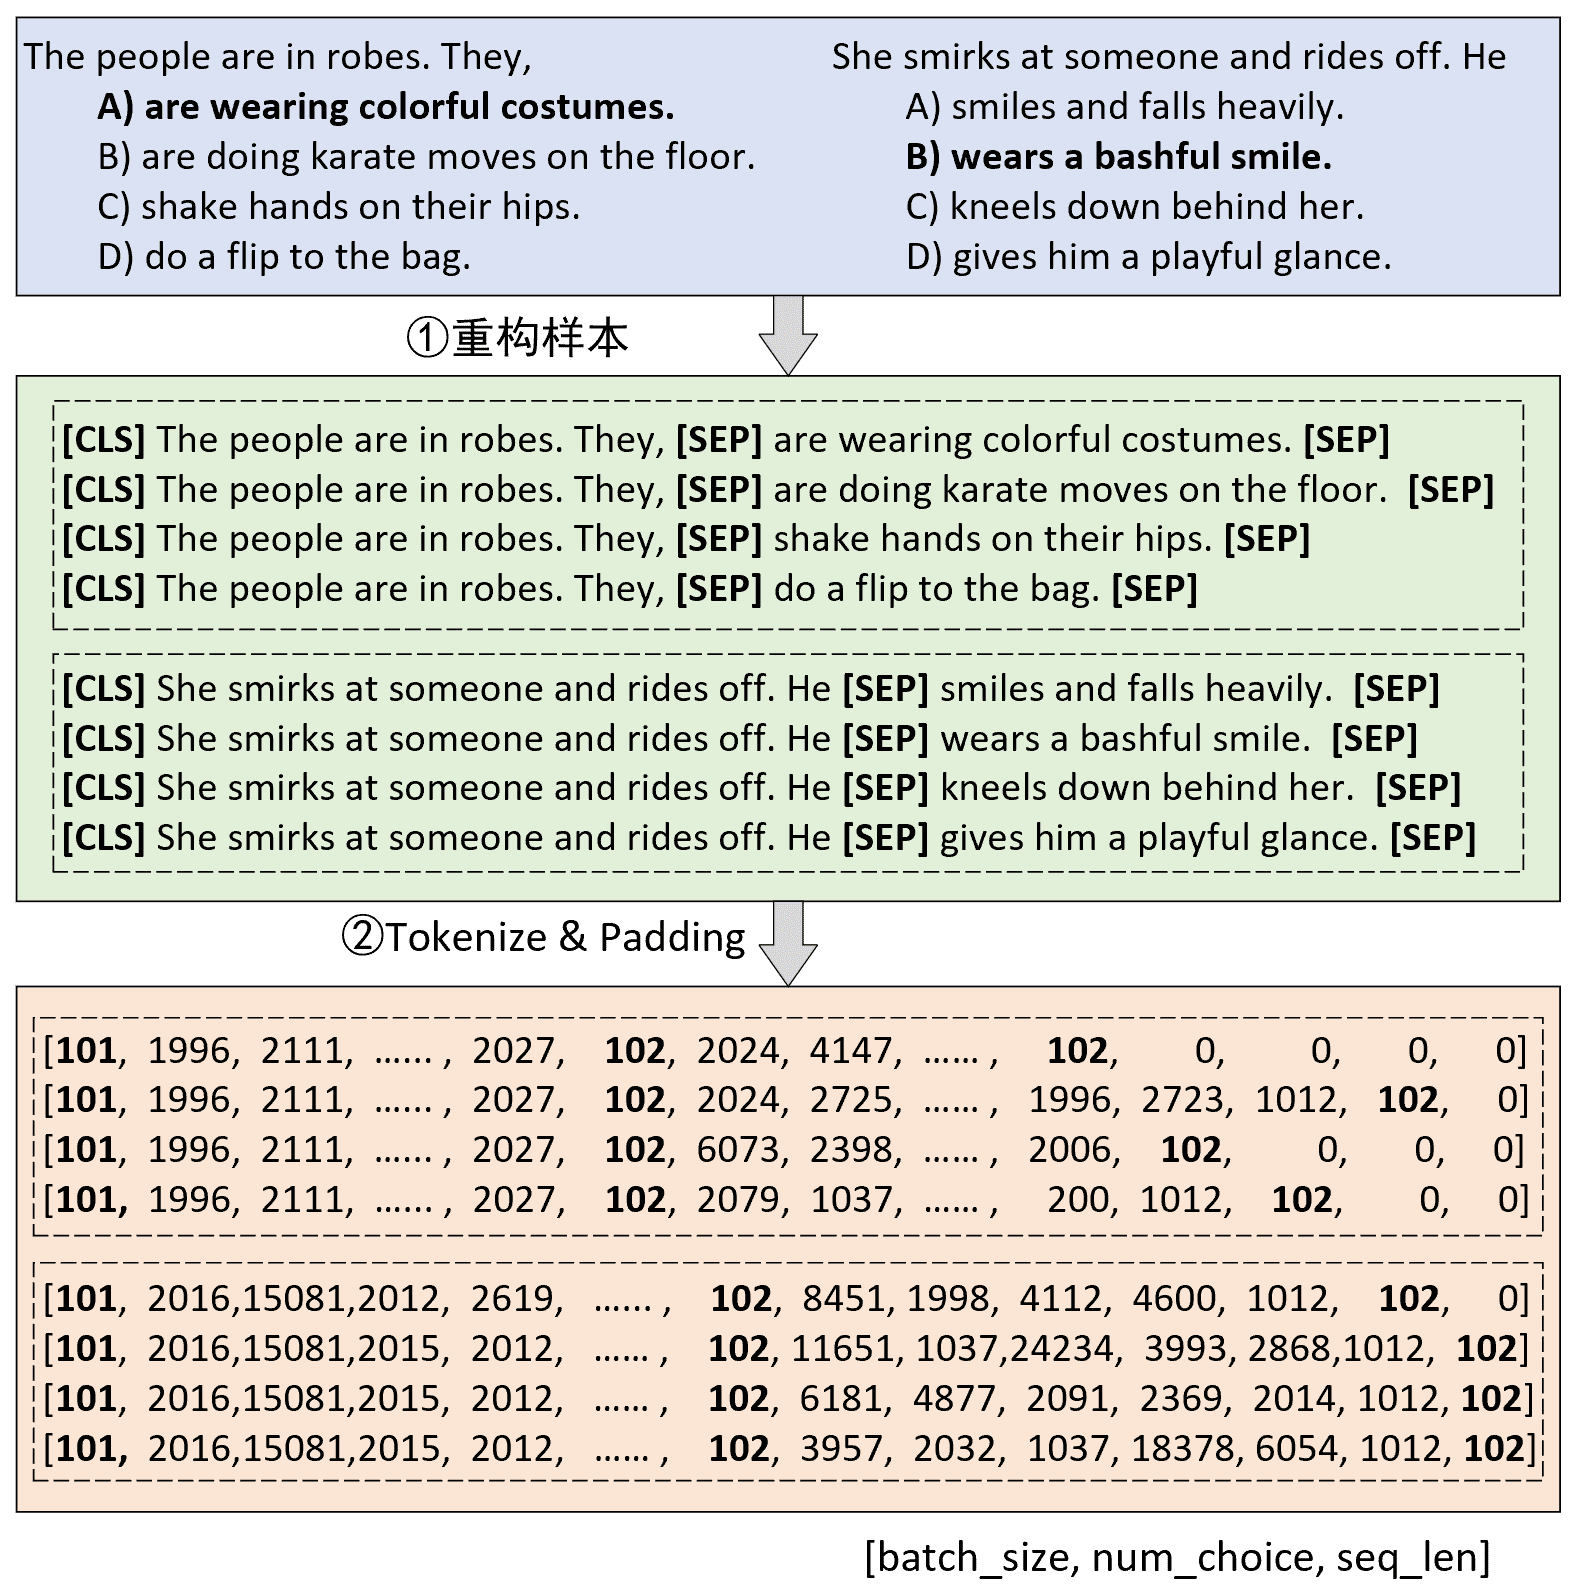
如图6-2所示,首先对于原始数据的每个样本(一个问题和四个选项),需要将问题同每个选项拼接在一起构造成为4个序列并添加上对应的分类符[CLS]和分隔符[SEP],即图中的第①步重构样本。紧接着需要将第①步构造得到的序列转换得到Token id并进行padding处理,此时便得到了一个形状为 [batch_size, num_choice, seq_len] 的3维矩阵,即图6-2中第2步处理完成后形状为[2,4,19]的结果。同时,在第②步中还要根据每个序列构造得到相应的 attention_mask 向量和 token_types_ids 向量(图中未画出),并且两者的形状也是 [batch_size, num_choice, seq_len]。
其次是将第②步处理后的结果变形成 [batch_sizenum_choice, seq_len] 的2维形式,因为BERT模型接收输入形式便是一个二维的矩阵。在经过BERT模型进行特征提取后,将会得到一个形状为 [batch_sizenum_choice, hidden_size] 的2维矩阵,最后再乘上一个形状为 [hidden_size,1] 的矩阵并变形成 [batch_size, num_choice] 即可完成整个分类任务。
6.2.4 数据集构造#
在说完数据集构造的整理思路后,下面我们就来正式编码实现整个数据集的构造过程。同样,对于数据预处理部分我们可以继续继承之前文本分类处理的这个类 LoadSingleSentenceClassificationDataset ,然后再稍微修改其中的部分方法即可。同时,由于在前两个示例[3] [4]中已经就tokenize和词表构建等内容做了详细的介绍,所以这部分内容就不再赘述。
第1步:重构样本和Tokenize
如图6-2处理流程所示,需要对原始样本进行重构以及转换得到每个序列对应的Token id,下面首先是在data_process()方法中来定义如何读取原始数据:
 1 class LoadMultipleChoiceDataset(LoadSingleSentenceClassificationDataset):
 2     def __init__(self, num_choice=4, kwargs):
 3         super(LoadMultipleChoiceDataset, self).__init__(kwargs)
 4         self.num_choice = num_choice
 5
 6     def data_process(self, filepath):
 7         data = pd.read_csv(filepath)
 8         questions = data['startphrase']
 9         answers0, answers1 = data['ending0'], data['ending1']
10         answers2, answers3 = data['ending2'], data['ending3']
11         labels = [-1]  len(questions)
12         if 'label' in data:
13             labels = data['label']
14         all_data = []
15         max_len = 0
16         for i in tqdm(range(len(questions)), ncols=80):
17             t_q = [self.vocab[token] for token in self.tokenizer(questions[i])]
18             t_q = [self.CLS_IDX] + t_q + [self.SEP_IDX]
19             t_a0 = [self.vocab[token] for token in self.tokenizer(answers0[i])]
20             t_a1 = [self.vocab[token] for token in self.tokenizer(answers1[i])]
21             t_a2 = [self.vocab[token] for token in self.tokenizer(answers2[i])]
22             t_a3 = [self.vocab[token] for token in self.tokenizer(answers3[i])]
23             max_len = max(max_len, len(t_q) + max(len(t_a0), len(t_a1), len(t_a2), len(t_a3)))
24             seg_q = [0]  len(t_q)
25             seg_a0 = [1]  (len(t_a0) + 1)
26             seg_a1 = [1]  (len(t_a1) + 1)
27             seg_a2 = [1]  (len(t_a2) + 1)
28             seg_a3 = [1]  (len(t_a3) + 1)
29             all_data.append((t_q, t_a0, t_a1, t_a2, t_a3, seg_q,
30                              seg_a0, seg_a1, seg_a2, seg_a3, labels[i]))
31         return all_data, max_len
在上述代码中,第1~4行用于继承之前的 LoadSingleSentenceClassificationDataset 类以及添加一个新的参数 num_choice 也就是分类数。第7~10行则是根据文件路径来读取原始数据并按对应字段取得问题和答案。第11~13行则是用来判断是否存在正确标签,因为测试集中不含有标签。第15行 max_len 则是用来保存数据集中最长序列的长度。第16行为一个循环用来遍历每一个问题以及对应的答案;第17~18行是将原始问题根据词表转换为对应的Token id,同时在起止位置分别加上[CLS]和[SEP]符号;第19~23行是分别将每个问题对应的4个选项转换为对应的Token id,以及保存最大序列的长度;第24~28行是用来构造对应的 token_type_ids 向量;第29~30行是分别将每一个问题以及对应的4个选项处理后的结果保存和返回最后的结果。
注意,这里还没有将每个问题同对应的4个选项进行拼接。
第2步:拼接与padding
在处理得到每个问题及对应选项的Token ids和 token_type_ids 后,再定义一个 generate_batch() 方法对每个batch中的数据拼接和padding处理,代码如下:
 1     def generate_batch(self, data_batch):
 2         batch_qa, batch_seg, batch_label = [], [], []
 3
 4         def get_seq(q, a):
 5             seq = q + a
 6             if len(seq) > self.max_position_embeddings - 1:
 7                 seq = seq[:self.max_position_embeddings - 1]
 8             return torch.tensor(seq + [self.SEP_IDX], dtype=torch.long)
 9
10         for item in data_batch:
11             tmp_qa = [get_seq(item[0], item[1]),get_seq(item[0], item[2]),
12                       get_seq(item[0], item[3]),get_seq(item[0], item[4])]
13             tmp_seg = [torch.tensor(item[5] + item[6], dtype=torch.long),
14                        torch.tensor(item[5] + item[7], dtype=torch.long),
15                        torch.tensor(item[5] + item[8], dtype=torch.long),
16                        torch.tensor(item[5] + item[9], dtype=torch.long)]
17             batch_qa.extend(tmp_qa)
18             batch_seg.extend(tmp_seg)
19             batch_label.append(item[-1])
20         batch_qa = pad_sequence(batch_qa, padding_value=self.PAD_IDX,
21                                 batch_first=True,max_len=self.max_sen_len)
22         batch_mask = (batch_qa == self.PAD_IDX).view(
23                                  [-1, self.num_choice, batch_qa.size(-1)])
24         batch_qa = batch_qa.view([-1, self.num_choice, batch_qa.size(-1)])
25         batch_seg = pad_sequence(batch_seg,padding_value=self.PAD_IDX,
26                                  batch_first=True,max_len=self.max_sen_len)
27         batch_seg = batch_seg.view([-1,self.num_choice, batch_seg.size(-1)])
28         batch_label = torch.tensor(batch_label, dtype=torch.long)
29         return batch_qa, batch_seg, batch_mask, batch_label
在上述代码中,第4~8行中的get_seq()方法是用于根据传入的问题Token id和答案Token id拼接得到一个完整的Token id,并将超过长度的部分进行截取处理。第11~12行是将每个问题分别与其对应的4个选项进行拼接。第13~16行是分别构造得到每个问题与其对应的4个选项所形成的token_type_ids向量。第17~19行是保存每个Batch所有样本处理好的结果。第20~28行是对各个输入进行padding或者变形等以得到对应形状的输入,最后处理结束后batch_qa、batch_seq和batch_mask的维度均为[batch_size, num_choice, src_len],batch_label的形状为[batch_size,]。
第3步:使用示例
在完成上述两个步骤之后,整个数据集的构建就算是已经基本完成了,可以通过如下代码进行数据集的载入:
 1 from utils.data_helpers import LoadMultipleChoiceDataset
 2 from Tasks.TaskForMultipleChoice import ModelConfig
 3 from transformers import BertTokenizer
 4
 5 if __name__ == '__main__':
 6     config = ModelConfig()
 7     tokenizer = BertTokenizer.from_pretrained(config.pretrained_model_dir)
 8     load_dataset = LoadMultipleChoiceDataset(vocab_path=config.vocab_path,
 9                 tokenizer=tokenizer.tokenize,batch_size=2,max_sen_len=None,
10            max_position_embeddings=512,pad_index=0,is_sample_shuffle=False,
11                         num_choice=model_config.num_labels)
12     train_iter, test_iter, val_iter = \
13         load_dataset.load_train_val_test_data(model_config.train_file_path,
14                                               model_config.val_file_path,
15                                               model_config.test_file_path)
16     for qa, seg, mask, label in test_iter:
17         print(" ### input ids:")
18         print(qa.shape)  # [batch_size,num_choice, max_len]
19         print(qa[0])
20         print(" ### attention mask:")
21         print(mask.shape)  # [batch_size,num_choice, max_len]
22         print(mask[0])
23         print(" ### token type ids:")
24         print(seg.shape)  # [batch_size,num_choice, max_len]
25         print(seg[0])
26         print(label.shape)  # [batch_size]
27         trans_to_words(qa[0], load_dataset.vocab.itos)
28         break
上述代码运行结束后将会看到类似如下所示的结果:
 1 ### input ids: torch.Size([2, 4, 22])
 2 tensor([[101,  1996,  2111,  2024,  1999, 17925,  1012,  2027,   102,  2024,
 3         4147, 14231, 12703,  1012,   102,     0,     0,     0,     0,     0,
 4            0,     0],
 5         [101,  1996,  2111,  2024,  1999, 17925,  1012,  2027,   102,  2024,
 6         2725, 16894,  5829,  2006,  1996,  2723,  1012,   102,     0,     0,
 7            0,     0],
 8         [101,  1996,  2111,  2024,  1999, 17925,  1012,  2027,   102,  6073,
 9         2398,  2006,  2037,  6700,  1012,   102,     0,     0,     0,     0,
10            0,     0],
11         [101,  1996,  2111,  2024,  1999, 17925,  1012,  2027,   102,  2079,
12         1037, 11238,  2000,  1996,  4524,  1012,   102,     0,     0,     0,
13            0,     0]])
14 ### attention mask: torch.Size([2, 4, 22])
15 tensor([[False, False,......,True,  True,  True,  True,  True, True,  True],
17         [False, False,......,False, False, False, True,  True, True,  True],
19         [False, False,......,False,  True,  True, True,  True, True,  True],
21         [False, False,......,False, False,  True, True,  True, True, True]])
23 ### token type ids: torch.Size([2, 4, 22])
24 tensor([[0, 0, 0, 0, 0, 0, 0, 0, 0, 1, 1, 1, 1, 1, 1, 0, 0, 0, 0, 0, 0, 0],
25         [0, 0, 0, 0, 0, 0, 0, 0, 0, 1, 1, 1, 1, 1, 1, 1, 1, 1, 0, 0, 0, 0],
26         [0, 0, 0, 0, 0, 0, 0, 0, 0, 1, 1, 1, 1, 1, 1, 1, 0, 0, 0, 0, 0, 0],
27         [0, 0, 0, 0, 0, 0, 0, 0, 0, 1, 1, 1, 1, 1, 1, 1, 1, 0, 0, 0, 0, 0]])
28 torch.Size([2]) Question and Answer:
29 [CLS] the people are in robes . they [SEP] are wearing colorful costumes . [SEP] [PAD] [PAD] [PAD] [PAD] [PAD] [PAD] [PAD]
30 [CLS] the people are in robes . they [SEP] are doing karate moves on the floor . [SEP] [PAD] [PAD] [PAD] [PAD]
31 [CLS] the people are in robes . they [SEP] shake hands on their hips . [SEP]
[PAD] [PAD] [PAD] [PAD] [PAD] [PAD]
32 [CLS] the people are in robes . they [SEP] do a flip to the bag . [SEP] [PAD] [PAD] [PAD] [PAD] [PAD]
在上述结果中,其中第29~32行为根据Token id再转换为字符串后的结果。
到此,对于整个数据集的构建过程就介绍完了,下面就开始继续介绍问答选择模型的实现内容。
6.3 选择任务#
6.3.1 前向传播#
正如第6.2节内容所介绍,我们只需要在原始BERT模型的基础上再加一个分类层即可,因此这部分代码相对来说也比较容易理解。如图2-4所示,在 BertForMultipleChoice.py 文件中,首先需要定义一个类以及相应的初始化函数,如下:
 1 from ..BasicBert.Bert import BertModel
 2 import torch.nn as nn
 3
 4 class BertForMultipleChoice(nn.Module):
 5     def __init__(self, config, bert_pretrained_model_dir=None):
 6         super(BertForMultipleChoice, self).__init__()
 7         self.num_choice = config.num_labels
 8         if bert_pretrained_model_dir is not None:
 9             self.bert = BertModel.from_pretrained(config, bert_pretrained_model_dir)
10         else:
11             self.bert = BertModel(config)
12         self.dropout = nn.Dropout(config.hidden_dropout_prob)
13         self.classifier = nn.Linear(config.hidden_size, 1)
在上述代码中,第8~11行便是根据相应的条件返回一个BERT模型,第13行则是定义了一个分类层。
然后再是定义完成整个前向传播过程,代码如下:
 1     def forward(self, input_ids,
 2                 attention_mask=None,
 3                 token_type_ids=None,
 4                 position_ids=None,
 5                 labels=None):
 6         flat_input_ids=input_ids.view(-1,input_ids.size(-1)).transpose(0, 1)
 7         flat_token_type_ids=token_type_ids.view(-1,token_type_ids.size(-1)).transpose(0, 1)
 8         flat_attention_mask=attention_mask.view(-1,token_type_ids.size(-1))
 9         pooled_output, _ = self.bert(
10             flat_input_ids, # [src_len,batch_size*num_choice]
11             flat_attention_mask, # [batch_size*num_choice,src_len]
12             flat_token_type_ids, # [src_len,batch_size*num_choice]
13             position_ids=position_ids)
14         pooled_output = self.dropout(pooled_output)
15         logits = self.classifier(pooled_output) # [batch_size*num_choice, 1]
16         shaped_logits = logits.view(-1, self.num_choice)
17         if labels is not None:
18             loss_fct = nn.CrossEntropyLoss()
19             loss = loss_fct(shaped_logits, labels.view(-1))
20             return loss, shaped_logits
21         else:
22 return shaped_logits在上述代码中,第6~8行用于将3维的输入变成2维的输入(也就是图6-2中的第③步),这是因为BERT所接收的输入形式便是两个维度。同时根据需要还将src_len 这个维度放到了最前面。第9~13行则是通过原始的BERT模型提取得到每个序列(指的是每个问题和其中一个选项所构成的序列,即图6-2中第③步后的每一行)的特征表示,输出形状为 [batch_size*num_choice, hidden_size] 。第15~16行是先进行分类处理,然后再变形得到每个问题所对应预测选项的logits值,最后输出形状为 [batch_size, num_choice] 。第17~22行是根据相应的判断条件返回损失或者 logits 值。
6.3.2 模型训练#
首先,如图2-5所示在Tasks目录下新建一个名为 TaskForMultipleChoice.py 的模块,然后定义一个 ModelConfig 类来对分类模型中的超参数以及其它变量进行管理。部分代码如下所示:
 1 class ModelConfig:
 2     def __init__(self):
 3         self.project_dir = os.path.dirname(os.path.dirname(os.path.abspath(__file__)))
 4         self.dataset_dir = os.path.join(self.project_dir, 'data', 'MultipleChoice')
 5         self.pretrained_model_dir = os.path.join(self.project_dir, "bert_base_uncased_english")
 6         self.vocab_path=os.path.join(self.pretrained_model_dir, 'vocab.txt')
 7         self.device = torch.device('cuda:0' if torch.cuda.is_available() else 'cpu')
 8         self.train_file_path = os.path.join(self.dataset_dir, 'train.csv')
 9         self.val_file_path = os.path.join(self.dataset_dir, 'val.csv')
10         self.test_file_path = os.path.join(self.dataset_dir, 'test.csv')
11         self.model_save_dir = os.path.join(self.project_dir, 'cache')
12         self.logs_save_dir = os.path.join(self.project_dir, 'logs')
13         self.is_sample_shuffle = True
14         self.batch_size = 16
15         self.max_sen_len = None
16         self.num_labels = 4  # num_choice
17         self.learning_rate = 2e-5
18         self.epochs = 10
19         self.model_val_per_epoch = 2
20         logger_init(log_file_name='choice', log_level=logging.INFO,
21                                                 log_dir=self.logs_save_dir)
在上述代码中,第3~12行分别用来获取各个文件的所在路径;第13~19行则是设置模型对应的超参数;第20~31行是初始化日志打印的相关信息。
同时,为了展示训练时的预测结果,这里需要写一个函数来进行格式化:
 1 def show_result(qas, y_pred, itos=None, num_show=5):
 2     count = 0
 3     num_samples, num_choice, seq_len = qas.size()
 4     qas = qas.reshape(-1)
 5     strs = np.array([itos[t] for t in qas]).reshape(-1, seq_len)
 6     for i in range(num_samples):
 7         s_idx = i  num_choice
 8         e_idx = s_idx + num_choice
 9         sample = strs[s_idx:e_idx]
10         if count == num_show:
11             return
12         count += 1
13         for j, item in enumerate(sample):  # 每个样本的四个答案
14             q, a, _ = " ".join(item[1:]).replace(" .", ".").replace(" ##", "").split('[SEP]')
15             if y_pred[i] == j:
16                 a += " ## True"
17             else:
18                 a += " ## False"
19             logging.info(f"[{count + 1}/{num_show}] ### {q + a}")
20         logging.info("\n")
在上述函数调用结束可以输出类似如下所示的结果:
1 - the people are in robes. they are wearing colorful costumes. ## False
2 - the people are in robes. they are doing karate moves on the floor. ## True
3 - the people are in robes. they shake hands on their hips. ## False
4 - the people are in robes. they do a flip to the bag. ## False
最后,我们便可以通过如下方法完成整个模型的微调,关键代码如下所示:
 1 def train(config):
 2     model = BertForMultipleChoice(config,config.pretrained_model_dir)
 3     ......
 4     optimizer=torch.optim.Adam(model.parameters(), lr=config.learning_rate)
 5     model.train()
 6     tokenizer = BertTokenizer.from_pretrained(config.pretrained_model_dir)
 7     data_loader = LoadMultipleChoiceDataset(
 8          vocab_path=config.vocab_path,tokenizer=tokenizer.tokenize,
 9          batch_size=config.batch_size,max_sen_len=config.max_sen_len,
10          max_position_embeddings=config.max_position_embeddings,
11          pad_index=config.pad_token_id,
is_sample_shuffle=config.is_sample_shuffle,
12          num_choice=config.num_labels)
13     train_iter, test_iter, val_iter = \
14         data_loader.load_train_val_test_data(config.train_file_path,
15                         config.val_file_path,config.test_file_path)
16     max_acc = 0
17     for epoch in range(config.epochs):
18         losses = 0
19         start_time = time.time()
20         for idx, (qa, seg, mask, label) in enumerate(train_iter):
21             loss, logits = model(input_ids=qa,attention_mask=mask,
22                                  token_type_ids=seg,position_ids=None,
23                                  labels=label)
24             optimizer.zero_grad()
25             loss.backward()
26             optimizer.step()
27             losses += loss.item()
28             acc = (logits.argmax(1) == label).float().mean()
29             if idx % 10 == 0:
30                 logging.info(f"Epoch:{epoch}, Batch[{idx}/{len(train_iter)}],"
31                    f"Train loss :{loss.item():.3f}, Train acc: {acc:.3f}")
32             if idx % 100 == 0:
33                 y_pred = logits.argmax(1).cpu()
34                 show_result(qa, y_pred, data_loader.vocab.itos, num_show=1)
35         end_time = time.time()
36         train_loss = losses / len(train_iter)
37         logging.info(f"Epoch: {epoch}, Train loss: "
38         f"{train_loss:.3f}, Epoch time = {(end_time - start_time):.3f}s")
39         if (epoch + 1) % config.model_val_per_epoch == 0:
40             acc, _ = evaluate(val_iter,model,config.device, inference=False)
41             logging.info(f"Accuracy on val {acc:.3f}")
在上述代码中,第2行是根据指定预训练模型的路径初始化一个基于BERT的问答任务模型;第7~15行是载入相应的数据集;第17~36行则是整个模型的训练过程,完整示例代码可在项目仓库中进行获取。
如下便是网络的训练时的输出结果:
 1 - INFO: Epoch: 0, Batch[0/4597], Train loss :1.433, Train acc: 0.250
 2 - INFO: Epoch: 0, Batch[10/4597], Train loss :1.277, Train acc: 0.438
 3 - INFO: Epoch: 0, Batch[20/4597], Train loss :1.249, Train acc: 0.438
 4         ......
 5 - INFO: Epoch: 0, Batch[4590/4597], Train loss :0.489, Train acc: 0.875
 6 - INFO: Epoch: 0, Batch loss :0.786, Epoch time = 1546.173s
 7 - INFO: Epoch: 0, Batch[0/4597], Train loss :1.433, Train acc: 0.250
 8 - INFO: He is throwing darts at a wall. A woman, squats alongside flies side to side with his gun.  ## False
 9 - INFO: He is throwing darts at a wall. A woman, throws a dart at a dartboard.   ## False
10 - INFO: He is throwing darts at a wall. A woman, collapses and falls to the floor.   ## False
11 - INFO: He is throwing darts at a wall. A woman, is standing next to him.    ## True
12 - INFO: Accuracy on val 0.794
6.3.3 模型推理#
在完成模型的训练过程后,便可以将训练过程中保存好的模型用于任务的推理场景中。具体代码实现如下:
 1 def inference(config):
 2     model = BertForMultipleChoice(config,
 3                                   config.pretrained_model_dir)
 4     model_save_path = os.path.join(config.model_save_dir, 'model.pt')
 5     if os.path.exists(model_save_path):
 6         loaded_paras = torch.load(model_save_path)
 7         model.load_state_dict(loaded_paras)
 8         logging.info("## 成功载入已有模型,进行预测......")
 9     model = model.to(config.device)
10     tokenizer = BertTokenizer.from_pretrained(config.pretrained_model_dir)
11     data_loader = LoadMultipleChoiceDataset(vocab_path=config.vocab_path,
12                 tokenizer=tokenizer.tokenize,batch_size=config.batch_size,
13                 max_sen_len=config.max_sen_len,pad_index=config.pad_token_id,
14                 max_position_embeddings=config.max_position_embeddings,
15                 is_sample_shuffle=config.is_sample_shuffle)
16     test_iter = data_loader.load_train_val_test_data(config.test_file_path,only_test=True)
17     y_pred = evaluate(test_iter, model, config.device, inference=True)
18     logging.info(f"预测标签为:{y_pred.tolist()}")
在上述代码中,第2~3行是用来实例化一个问答任务模型;第4~8行是载入本地模型参数来重新初始化网络中的参数;第11~16行是载入新的测试数据;第17行是返回模型在测试集上的准确率。
到此,对于整个基于BERT预训练模型的SWAG数据集的问答模型就介绍完了。总的来讲,对于问答选择这一任务场景来说,只需要将每个问题与其对应的各个选项看成两个拼接在一起的序列,再输入到BERT模型中进行特征提取最后进行分类即可。